in Pagespeed
Improve WordPress load time permanently and sustainably: The guide
It's usually only a matter of time before a website becomes unbearably slow due to new features, extensions and tracking snippets. We tackle the issue at its root and guide you to optimise the website load time!
A fast website is essential for a positive user experience (UX) and thus for a high ranking in search results. The most common solution for this: install the plugin, have a sip of coffee, move on? It may be that the PageSpeed test result is in the green zone afterwards, but to sustainably optimize the load time in WordPress, a stronger foundation is required. For this, we take a closer look at the following 3 areas:
Please also pay attention to the order! A better infrastructure is nice, but it can only compensate for a too high data load to a limited extent. We therefore proceed step by step.
Blackhat PageSpeed techniques
We get a lot of enquiries from partners on the topic of loading time. Our founders Steffen and Dominik talked in detail about the topic in their podcast and even revealed a few blackhat PageSpeed techniques.

If you are not afraid to go deep and want to know how a cookie banner affects the PageSpeed score, it’s best to listen in.
Before we start: Before and after comparison!
Your visitors want speed, preferably immediately. Nevertheless, it is advisable to take the acceleration of the loading time slowly. The goal is to make the website faster without sacrificing the great functionalities. The images should load quickly and also be razor sharp.
To make sure we don’t accidentally break anything, we proceed very carefully. Step by step, we test each optimisation and measure the savings. The before-and-after comparison is essential to be able to understand the success of a measure. One of the best-known tools for measurement and optimisation is PageSpeed Insights from Google. There are also other providers such as GTmetrix. But no matter which tool you use for measurement, in the end it is important to remain consistent with a tool and to use it as long as possible for reliable results.
Core Web Vitals and PageSpeed Insights
Because many people look at the Google ranking, there are also the so-called Core Web Vitals as benchmarks in addition to the score from the PageSpeed Insights tool. PageSpeed Insights displays the Core Web Vitals for a queried page if enough data is available. These are the actual experience values of real visitors. In Search Console, we can see which pages are rated as good, need improvement or bad, and which vital metrics need improvement.
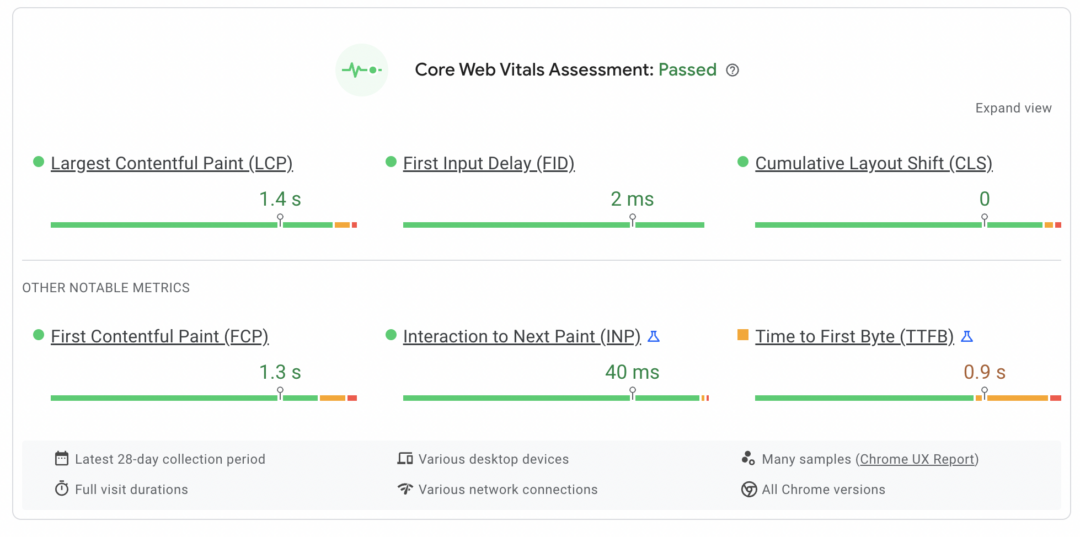
Example of passed Core Web Vitals assessment
It may be that the Core Web Vitals are considered passed, but the PageSpeed Insights Tool still shows room for improvement. During the PageSpeed test, the page is completely reloaded. However, a visitor does not, for example, load the cookie banner with every page view. Currently, however, the element is always included in the score.
In addition, the PageSpeed Insights tool simulates a relatively slow mobile device and internet connection. Often, actual users have faster devices and faster internet connections, so better results can be achieved in the field data collected from the Core Web Vitals.
Nevertheless, the PageSpeed tool is very helpful, because Google has established important cornerstones for a positive user experience for it. More annoying than a page that loads slowly is one that shifts so much that you click away. Here are the Core Web Vitals explained individually as a question:
- Largest Contentful Paint (LCP): How long does it take for the largest visual element in the visible area to load?
- First Input Delay (FID): How long does it take for the browser to respond to a visitor’s first interaction?
- Cumulative Layout Shift (CLS): How much do elements shift in the loading process?
With these metrics, Google wants to measure load time, interactivity and visual stability respectively. We will work our way forward step by step in order to improve all values in the end.
1. Data volume
There are countless ways to optimise the programming and infrastructure of a website. With all the technical gimmicks, reducing data volume is the surest way. When we tinker with loading strategy and infrastructure, the data volume can be reduced through compression and caching, but we tend to use up the efficiency gained by adding even more videos, images, fonts, functionalities, etc.
Extending Auto-Resizing of Images

Smartphone with picture in inappropriate (x) and appropriate (✓) size.
With modern image formats and lazy loading, we can shorten the loading time. However, WordPress has integrated a function that is still expandable, but offers a lot of potential, especially for smaller devices such as mobile phones. The golden rule is: if possible, match the image width to the screen width. If a loaded image is larger than it can be displayed due to the screen size, potential is wasted.
WordPress already offers the function to automatically save images in different sizes. If you upload an image in a standard WordPress installation, the image is automatically saved as a thumbnail. This feature can be further extended for your own design. If you know that the maximum image width in the design is 2000px, all images can automatically be saved in this size. Depending on the requirements of the project, we at Bleech have even saved up to 20 versions of an image!
This approach to images makes the job of content managers easier. They can confidently upload high-resolution images without having to edit them in Photoshop beforehand. Depending on the device and resolution, sizes for smartphones, tablets, laptops and additional retina sizes for high-resolution displays are dynamically created and displayed by the system.

Use modern image formats
Similar to the appropriate image width, the appropriate image format reduces the data load. The well-tried image format JPEG is still used well and with pleasure. In the meantime, however, there are new and faster image compressions. The current version of WebP is supported by almost all browsers on smartphones and desktops, including Chrome, Firefox, Safari, Edge and Opera. Soon this could be replaced by the even more efficient AVIF format.
A plugin like WebP Express automatically converts your website’s images and makes them available in a preferred way.
Reduce requests
Since the introduction of HTTP/2, the number of requests has had less influence. Nevertheless, it is worthwhile to look at all requested resources when calling up a page and to critically examine them. Each image, each font, each CSS and JavaScript file is requested individually by the browser. The back and forth between browser and server costs time and effort.
- Once a font appears in an inconspicuous place, we should consider whether it is better to exchange it for a font that is already in use.
- We don’t necessarily need an interactive map with our location in the footer on every subpage – instead, it can be exchanged for an image or a link to the “About Us” page.
Question and reduce plugins
Some plugins can cause requests. Especially when many functions in the frontend are provided via plugins, they use their own JavaScript and CSS files – for example for contact forms, overlays and cookie banners. These plug-ins consume resources on the server, load their own scripts, and slow down the loading time of individual pages. Unnecessary plug-ins should therefore be deactivated and important plug-in functions should be solved by programming the website.
Enable compression
Modern browsers are able to unpack compressed data. This allows a data package with HTML, CSS and JavaScript to be transferred more quickly as a zip file. GZIP compression is the most common method on the web because it is lossless and works well with text-based files. If compression is not present on a website, a load time tool like PageSpeed Insights would tell us. Otherwise, there are also special GZIP compression tests. If you feel comfortable with developer tools, you can of course also look in the HTTP Response Header. How compression is activated depends on your server.
2. Loading strategy
Now we send small, compressed data packets. This step is about building in smart logic for the loading strategy so that data is only delivered when it is needed. Unlike the first step, in this step we need to keep loading time and functionality in mind.
Switch off autoplay of videos
The automatic playback of a video aka autoplay is a popular “feature” with streaming services like Netflix. As long as our website is not a portal for videos, however, we should do without autoplay. As visitors, we want to get an idea of a landing page and orient ourselves. But if a moving image and sound (often also advertising) starts somewhere where we have to look for the off button, we often just press “Back” and try the next search result. This bouncing poses a danger to our performance goals.
Autoplay also slows down the loading time. Videos are of course much larger than images and thus have a higher data load. Therefore, it is better to use an image with a play button before the video. If you use an external player such as YouTube, you must obtain the visitor’s consent anyway in order to remain compliant with data protection.
Control lazy loading of images

From Fast and Slow: Images that are not yet visible are still being loaded and then show up.
Similar to a placeholder image for a video, asynchronous loading of images means that images are only loaded when you need them. Images outside the visible area are in the source code but are not downloaded by the browser until the visitor sees them. The trigger for loading is usually scrolling. WordPress offers this functionality out-of-the-box as of version 5.4. However, it happens that sometimes certain images in the template are exempt from this – so it’s worth checking the results. Earlier versions of WordPress themes also make use of plugins.
Control lazy loading of JavaScript
JavaScript often makes websites more interactive, e.g. through animations, dynamic reloading of content or additional functions. However, loading, interpreting and executing JavaScript files can slow down a website considerably. It is therefore advisable to load JavaScript with lower priority. This can be implemented via the defer attribute of script tags.
However, it is even more efficient if JavaScript files are only loaded when they are actually needed on a page. In a simple case, this can be achieved by script splitting. However, the best possible performance can be achieved with JavaScript hydration and an Island architecture. In this case, scripts are only loaded when they are directly needed for display and interactivity.

Host fonts yourself
Modern fonts like Google Fonts are very popular among webmasters. Not only because they are beautiful – they also enjoy great support across many browsers and devices. With the Google CDN (Content Delivery Network) and with local caching, they are usually very fast to load. However, embedding a resource from a Google server in the EU is no longer privacy compliant. One solution would be to load the fonts locally from your own server.
Alternatively, there are so-called web-safe fonts such as Helvetica, Arial, Verdana and Tahoma. Most of them are installed on the visitor’s end device and do not have to be downloaded.
Clean up the database
When a website is online for a little longer, some drafts and revisions accumulate in the database. Old plug-ins or deleted comments also make for superfluous tables and useless entries. The larger the database, the longer the loading times. So a regular clean-up is recommended, but we should proceed very carefully and make a backup regularly. Of course, as for many other load time measures, there are plugins that can be used. However, since we at Bleech are very familiar with databases, we proceed manually.
Use caching
When a page is called up, it is assembled by the system from various elements; contents such as texts and images are stored in a database and have to be fetched. This process is resource-intensive – in other words, slow.
Implement Full Page Caching
To relieve the database, there is full page caching, i.e. intermediate storage. A copy of this page is stored and can thus be displayed more quickly the next time it is called up. When a page is updated or at regular intervals, the cache is emptied so that the content remains up-to-date. We like to use the Cache Enabler plugin for this, as it is particularly easy to set up and works very reliably.
Implement browser caching
Caching can take place on different levels. The shortest way to display a cached page again is via the client’s or visitor’s browser. For this, a setting must be made via .htaccess or via a caching plugin such as WP Rocket, depending on your configuration. WP Rocket is a comprehensive plugin and offers further functions, such as compression, a CDN, etc.

In the podcast Steffen and Dominik discuss caching and explain why complex caching WordPress plugins are not the right choice.
In a browser cache, HTML, CSS and JavaScript files as well as images are stored locally on the visitor’s computer and can thus be displayed again more quickly. The cached files are managed by the browser and deleted or updated. WordPress sends the browser information regarding the lifetime of the content (expiry), i.e. how long it should be stored. Caching is also integrated on the server to save resources and improve performance.
Implement server caching via object cache
For dynamic websites, such as a forum, it is not advisable to rely on full page caching due to the many updates from comments and new posts. Visitors will see the page quickly, but it will be out of date. There is another cache for this, the server-side cache. So-called object caching means that the results of database queries are cached to reduce the response time of the server and to relieve the database.
Redis: Persistent Object Cache
We recommend Redis as a persistent object cache. There is also Memcached as an option, which is somewhat simpler but has fewer functions. To use the in-memory database, you must first install it on the server and configure it as a cache. The wp-config.php must be adapted for this. You also need to install a PHP extension and a WordPress plugin. Of course, this requires effort and expertise, but it has a positive effect on the loading times.
Minify CSS and JavaScript
For comprehensibility, developers write comments and detailed variable names in files and use spaces and line spacing for readability. These points make files larger – minification, on the other hand, makes them smaller by reducing the files to the essentials. This is usually automated via a plugin. Autoptimize and the already mentioned WP Rocket plugin are popular options for this.
3. Infrastructure
If you’ve read this far, you’re probably well versed in WordPress, but for the budding WordPress nerds, here are a few explanations of terms and basic functions.
- The server is a computer on which your website is hosted.
- A visitor accesses it by entering the domain in his browser. It is linked to an IP address, i.e. the address of the server.
- Because your website is hosted on the server of an operator, these service providers are also called hosters and the service web hosting.
Switch to a Premium DNS Provider
Before a user can access our website, the browser must know where it is getting the content from. The domain name is easier to remember than a string of numbers, as in the case of the IP address. It is a combination of numbers and dots. The combination is delivered by a DNS server in milliseconds. Here, at this first step, however, there are already differences in quality between providers, and the first hurdle “Time to First Byte” or “TTFB” is affected by this.
Using your own server or managed hosting
It is possible to run your own server or rent one and take care of the server management. However, due to the popularity of WordPress and the complexity of hosting, most resort to one of two options: either “shared hosting” or “managed hosting”.
Shared Hosting
The big disadvantage of shared hosting or a shared server is the “neighbours.” You can’t choose your area. In the worst case, the other websites peak at the same time as yours. Or they have a lax attitude to security and are regularly attacked. With shared hosting, we often don’t have the matter in our own hands, but rely on unknown third parties.
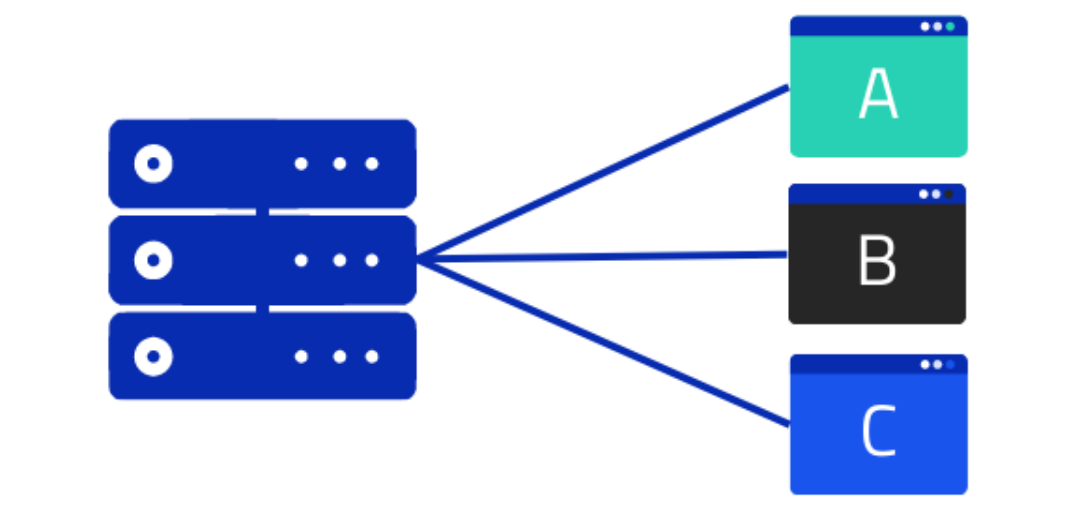
Several websites share one server.
Managed Hosting via dedicated server
For the highest demands on performance, security and data protection, we recommend a dedicated managed server. Here, the server is technically managed by a web hoster, similar to shared hosting.
However, the entire server is exclusively available for your own website, so that the capacity and performance do not have to be shared with other websites. This also ensures a clear separation of data.
The web host also takes responsibility for regular security updates of the system components and takes additional measures to provide protection against hacker attacks. If individual extensions are required on the server, these can be installed and administered by the managed hosting support.

One website is located on a server.
For you, however, this may not be the most important thing in case of doubt or may even be a hindrance – in this case, we recommend paying attention to support issues such as automatic backups and response time of the support team.
Update PHP
Every new version of PHP also brings more speed. Usually, the current version can be viewed and updated via the hoster’s panel. Depending on the host, the procedure may vary, but it should not be complicated. Before updating PHP, however, make sure that the new PHP version is also compatible with the current WordPress version, plugins and theme. This should always be tested on a test instance first.
Content Delivery Network (CDN)
Operators of websites in another country or region with access figures in the 4-digit range or less per month do not necessarily need a CDN. A big advantage of a Content Delivery Network is the physical proximity of the server to the visitors. For example, a visitor from New Zealand will get the content from the requested site faster if the server, or CDN endpoint, is also located in New Zealand, instead of the response having to be sent all the way from Germany.
HTTP/2 or HTTP/3
HTTP/2 is a significant further development, is more stable and secure than the previous version of the Hypertext Transfer Protocol. A big advantage is the parallel and asynchronous downloading of files. In the previous section “Data volume” we talked about the number of requests – with HTTP/1 a maximum of 6 files can be downloaded in parallel, i.e. much slower in comparison. With HTTP/2, hundreds of data packets can be sent over one connection with prioritisation.
HTTP/3 is not yet used by default because it is still under development and is not supported by all browsers and web servers. However, it promises even better performance, stability and simpler implementation.
Conclusion: Monitoring and further optimization
We are sure that the implementation of the measures listed above will lead to an improvement of the Core Web Vitals. Even if not all points can be implemented so quickly due to the complexity, the PageSpeed Score should improve by a few points and valuable seconds will be saved in the loading time.
User Experience > PageSpeed Score
SEO is often the initiator for optimising the loading speed. The path to the perfect PageSpeed Score is often bumpy and sometimes even misses the mark. Through optimisation, it can happen that sometimes the loading time or score is better, but the UX suffers. We optimise the performance of websites as best we can, but not at any price and not at the expense of the users.
Tip! With the PageSpeed tool, you should also enter a subpage – many people only enter the start page without thinking, even though the page is often overloaded.
Monitoring: Load time dashboard
As a final tip, it is very important to regularly report on the core web vitality or loading time. It would be a shame if, after a major clean-up campaign, the loading time were to slow down gradually due to the further development of the website, the integration of advertising campaigns and other measures – and we only find out about it through a complaint. There are great possibilities for this, among other things you can find the data in the Search Console, for Google Data Studio there is also the CrUX Dashboard with field data from Chrome.
Continuously optimize the load time of your WordPress website
The development on the web is fast and so this list of measures also aims at effectiveness, not completeness. Of course, the recommendations depend heavily on the application. Our developers will of course be happy to take a look at your code.
How do you go about optimising pagespeed for your website? Do you have other experiences? Share this article on social media and join the discussion!
How can I make my WordPress website faster?
The measures to make a WordPress website faster can be divided into three main categories:
1. reduce data volume,
2. develop loading strategy,
3. improve infrastructure.
How do I measure the load time of my WordPress website?
There are plugins within WordPress, browser plugins as well as websites that randomly measure load time and make recommendations. Most valuable are tools that build up a history and allow not only monitoring but also comparison over different time periods.
Why is my WordPress page so slow?
The most common reasons for slow WordPress websites are: outdated image formats; oversized images; a shared and non-optimised server; a flexible but slow WordPress theme; and certain (or too many) plugins.

